Quick Start
The essentials in one page to get started with Adno.
An online application
The easiest way to get started is to use the online instance of Adno. It is free and does not require registration. You can also start from one of the examples provided on this site.
Adno is free software, which means you can use, study, modify, adapt it to your own needs and redistribute it under the terms of the MIT license. You can therefore install it for yourself and for others. The sources and installation instructions are available on GitHub.
Start a project
The home screen is Adno’s dashboard: it lets you create, import and manage projects stored in your browser.
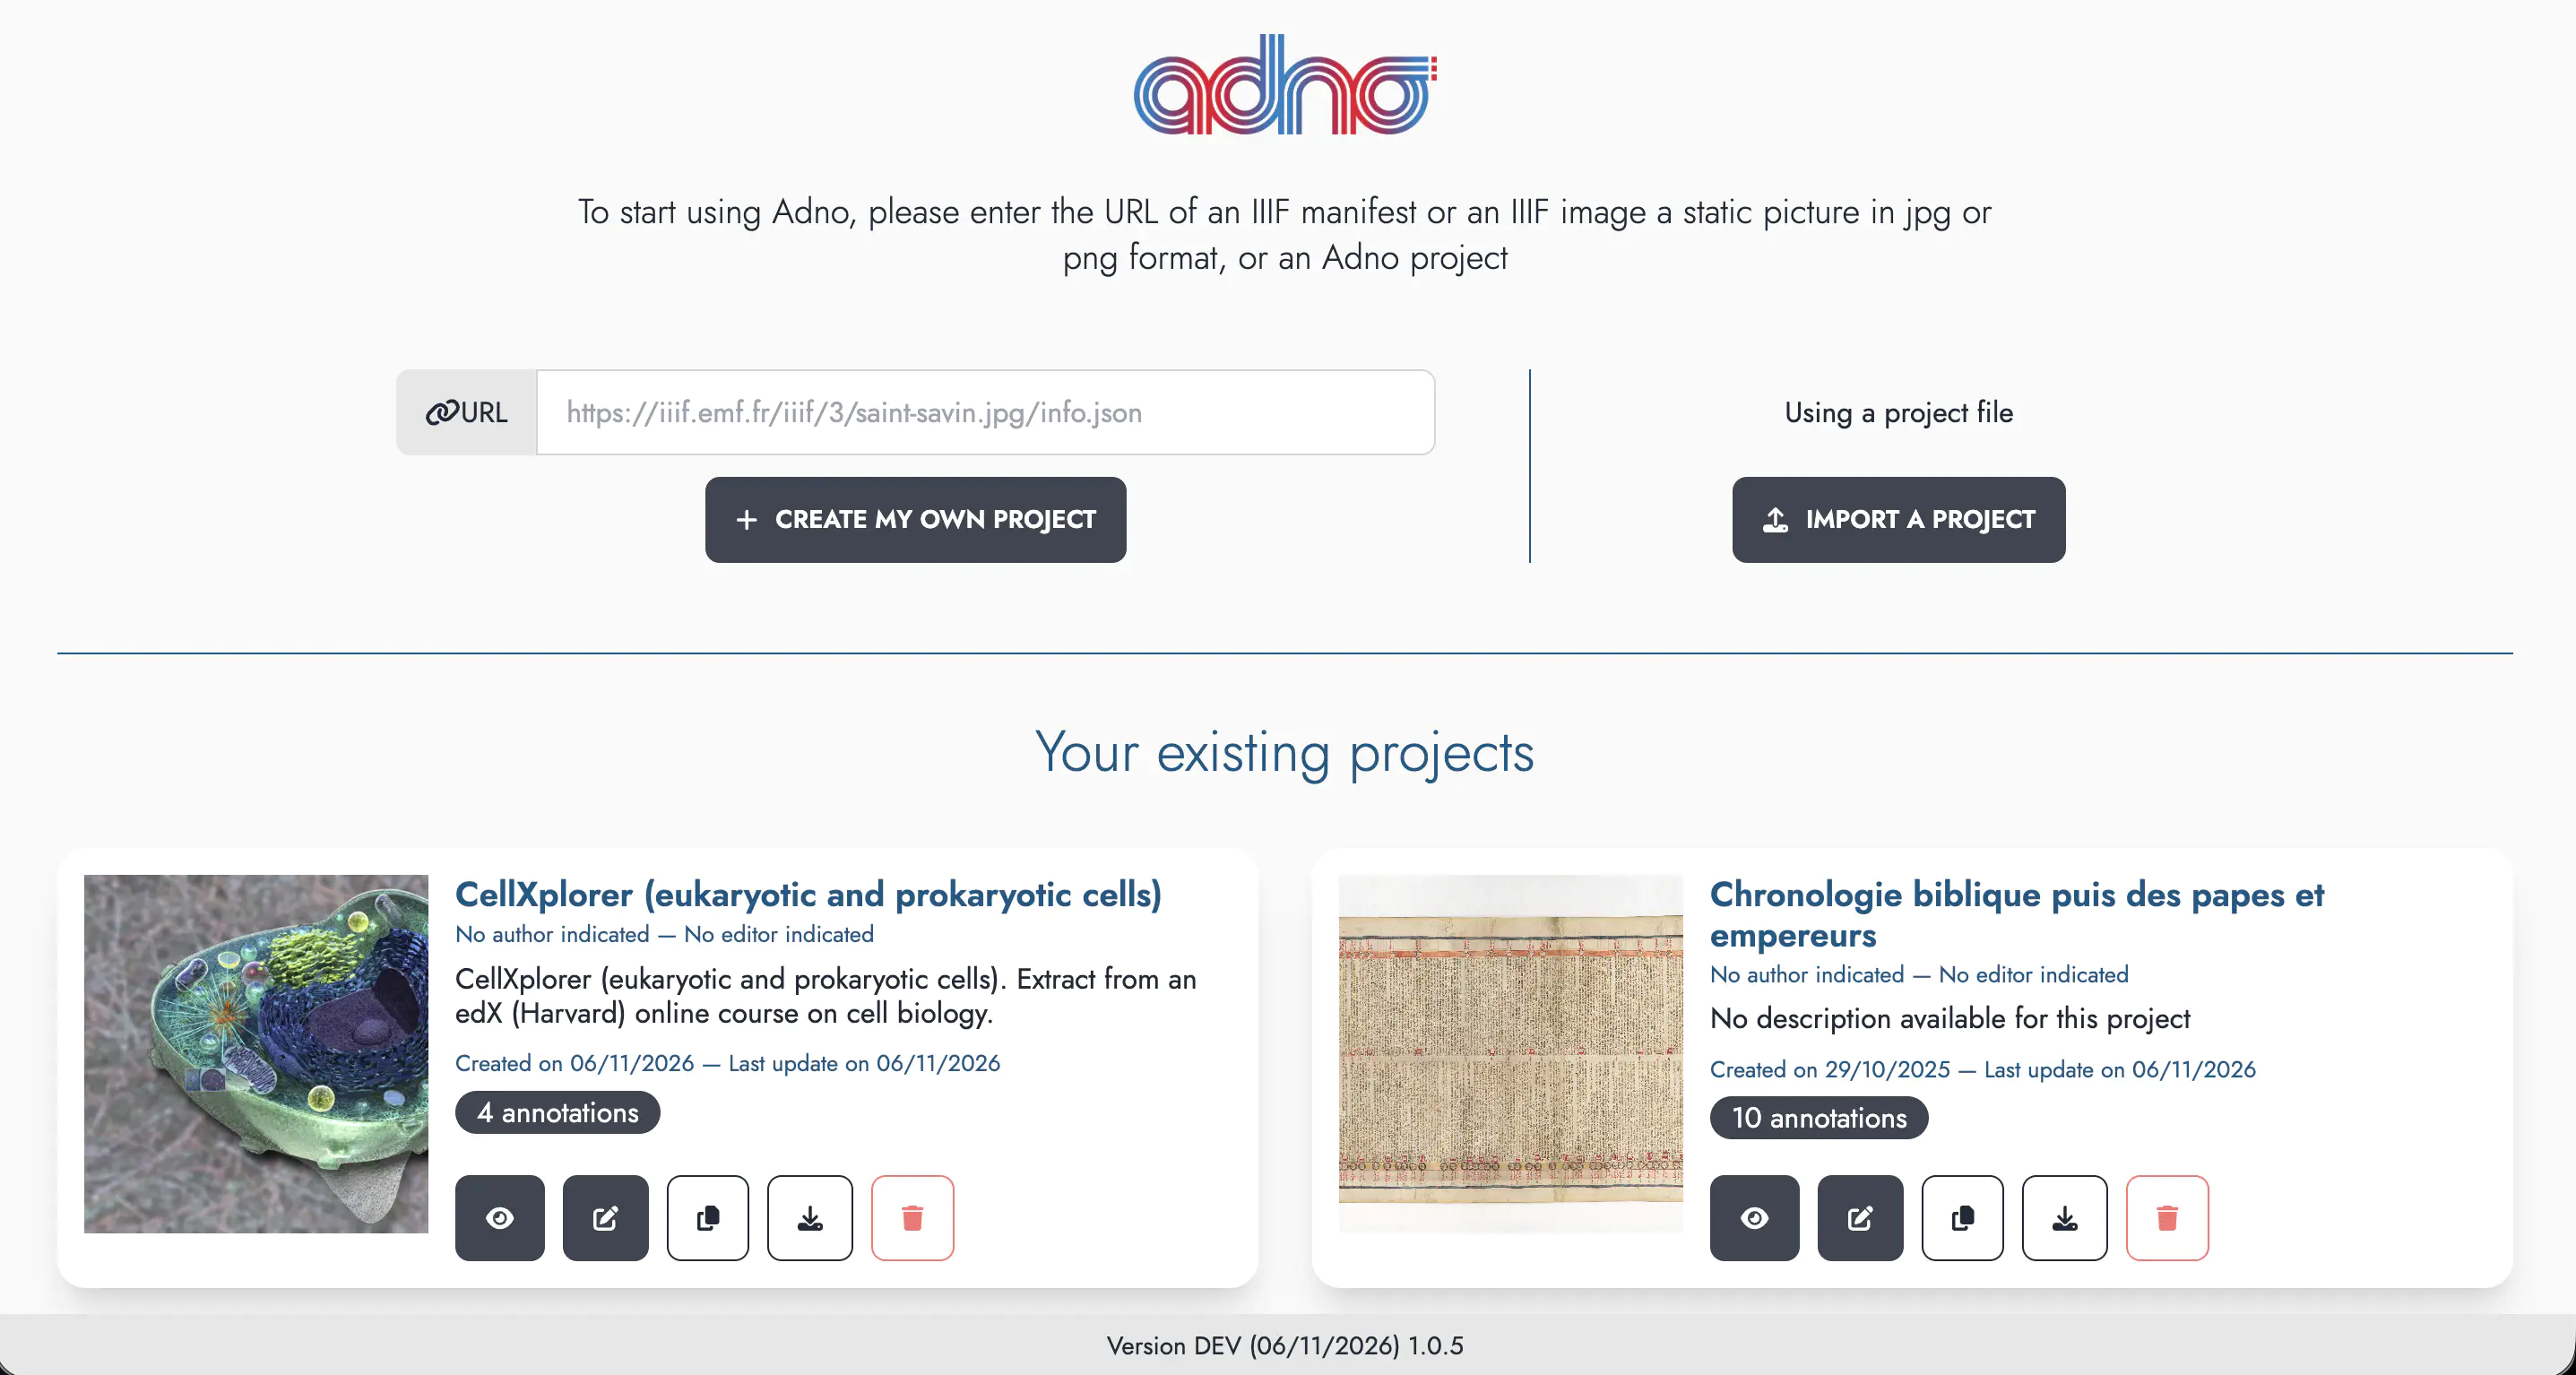
This dashboard allows you to:
- create a project by entering in the form the web address of a static image, an IIIF image or manifest, or an Adno project,
- import a project by loading an Adno project file,
- manage your projects previously created and stored in your browser.

For each project stored in the browser, a series of buttons gives access to the following features:
- View the project,
- Edit the project,
- Duplicate the project,
- Download the project file in Adno format (Web Annotation Model) or IIIF (manifest),
- Delete the project.
Start with a static image
The image in png or jpg format must be permanently available online and you must know its address (the URL). Enter this URL in the dedicated field, then click Create my project.
https://upload.wikimedia.org/wikipedia/commons/f/f3/Chenille_de_Grand_porte_queue_%28macaon%29.jpg
Start with an IIIF resource
If you are not familiar with IIIF or want to learn more, you can check out the IIIF Online Workshop provided by the IIIF Consortium and led by Glen Robson.
You can start with an IIIF manifest or an IIIF image.
An IIIF manifest

This is a URL provided by the publisher of the document. This link is often displayed next to the IIIF logo shown here.
The manifest describes the document with its metadata and the references of the images it contains.
https://api.artic.edu/api/v1/artworks/251131/manifest.json
If there are several images, browse them with the › button, then click Use this image for my project (or Cancel and return to home).

You can also retrieve the info.json URL of each image in the manifest by using this form.
An IIIF image
Use the direct URL of an IIIF image, which always ends with info.json.
https://gallica.bnf.fr/iiif/ark:/12148/btv1b8626777x/f13/info.json
Start with an example
The examples page offers resources from a wide range of domains to get you started.
Import a project
Use the Import a project button to upload a previously downloaded Adno file.
View and edit your project
The same interface lets you switch easily between reading and editing a project by clicking the colored view / edit switch at the top right of the interface.
View mode
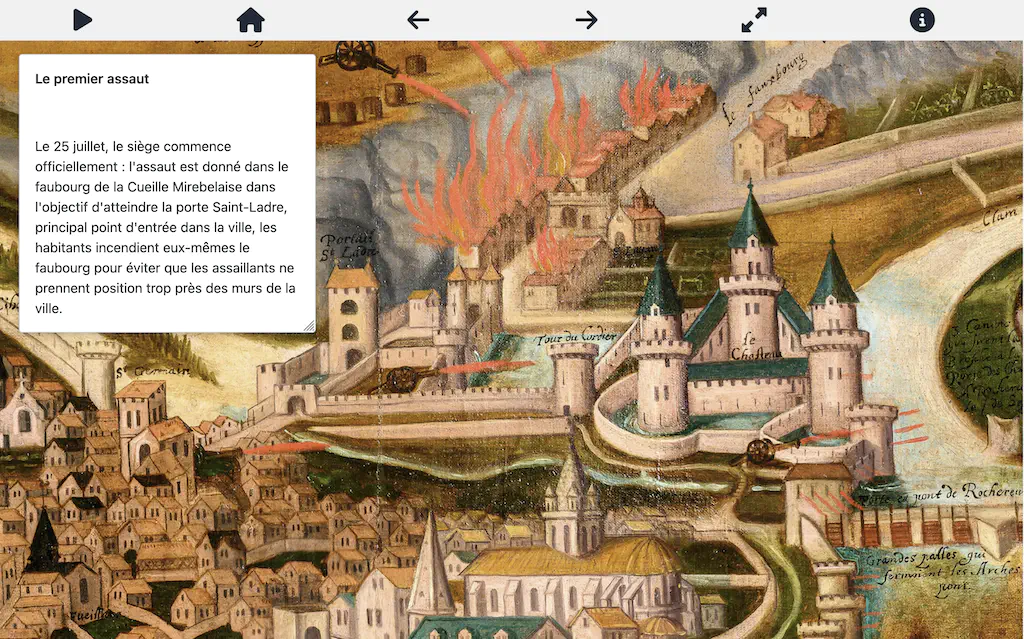
The navigation bar contains, on the left, the Adno logo to return to the dashboard, followed by the project information, and, on the right, the switch to go from view mode to edit mode, along with three buttons:
- to save the project,
- to view the project information,
- to set the viewer settings:
- View
- show the overview navigator,
- show outlines,
- show only the outline of the current annotation,
- show the annotation list on the side,
- set the default reading orientation,
- enable image rotation,
- set how orientation transitions behave,
- show the toolbar,
- show the toolbar in full screen mode,
- show an icon inside shapes,
- set the layout used to display multi-target annotations.
- Navigation
- filter annotations by keywords,
- delay between two annotations (5 seconds by default),
- start autoplay at the first annotation,
- start autoplay automatically on load,
- set the audio rendering mode.
- Annotation
- annotation thickness,
- annotation outline colors,
- outline color of the current annotation,
- annotation group colors.
- View
The collapsible list of annotations is on the left of the screen. By default, the area showing the content of the current annotation is to the left of the image; it can also be placed at the bottom or on the right, or be floating, depending on the settings.
The icons above the image trigger actions (also available from the keyboard):
- / Autoplay / Pause — keys
Porp, - Back to the beginning of the annotations,
- / Show / Hide annotation outlines — keys
Sors, - Previous annotation — key
←, - Next annotation — key
→, - Full screen — key
E, - Information about the project,
- Help and keyboard shortcuts.
Annotation list
Clicking an annotation card selects it as the current annotation and moves the image to the area associated with it, or to the area enclosing all the areas associated with it in the case of a multi-target annotation.
An icon at the bottom left of the screen lets you control how the annotation list is displayed:
- expanded,
- collapsed, in which case annotation numbers are shown,
- expanded on hover (dynamic display), otherwise collapsed.
Full screen view
In full screen view, only the current annotation is visible. Whether the icons are displayed can be set in the settings.
Keyboard shortcuts
Keyboard shortcuts improve accessibility:
porP: start autoplay,eorE: toggle full screen,sorS: show or hide annotation outlines,torT: show or hide the buttons,and: move from the current annotation to the previous or the next one.
Edit mode
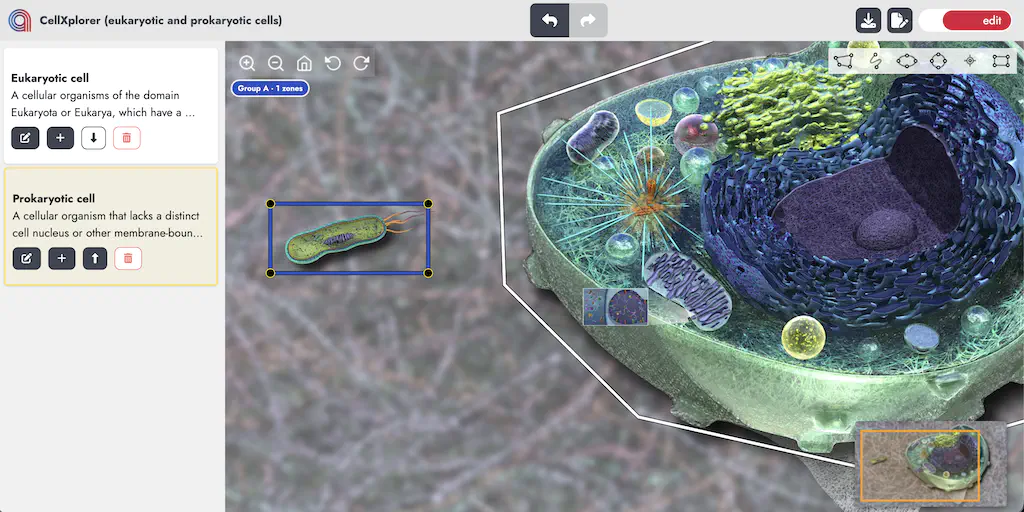
The navigation bar contains, on the left, the Adno logo to return to the dashboard and the project information, in the center the buttons to undo or redo the last actions, and on the right a switch to go from edit mode to view mode, along with a button to save the project and another to edit the project information.
- undo the last action,
- redo the undone action,
- save the project,
- edit the project information.
To create a new annotation, choose an annotation shape:

Then select an area on the image by clicking and dragging. As soon as you release, an empty annotation is added to the annotation list. Then click the edit button to add content, and finally Save.
To modify the content of an existing annotation, click its card, then the edit button. To resize it, drag the small circles placed on its outline (regular shapes).
Actions to manage each annotation from the annotation list:
- Edit this annotation,
- Add a new target to the annotation,
- Move the annotation within the annotation list,
- Delete the annotation.
Edit an annotation
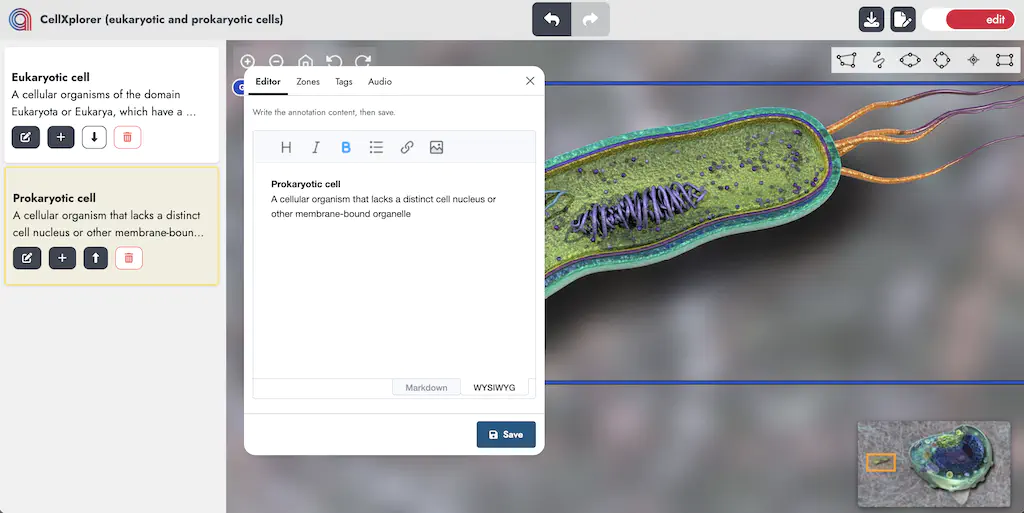
This modal window has four tabs:
- Editor: edit the content of the annotation,
- Zones: manage the target areas on the image,
- Tags: associate keywords with the annotation,
- Audio: associate an audio resource with the annotation.
Editor tab
The content of an annotation is generally a short text. However, it is possible to insert rich content.
Two editing modes are available, which you choose with the switch at the bottom of the window (WYSIWYG by default):
- WYSIWYG with icons (heading levels, italics, bold, bulleted list, hyperlink, image),
- Markdown: a lightweight text markup system, which is how annotation content is stored.
Managing zones
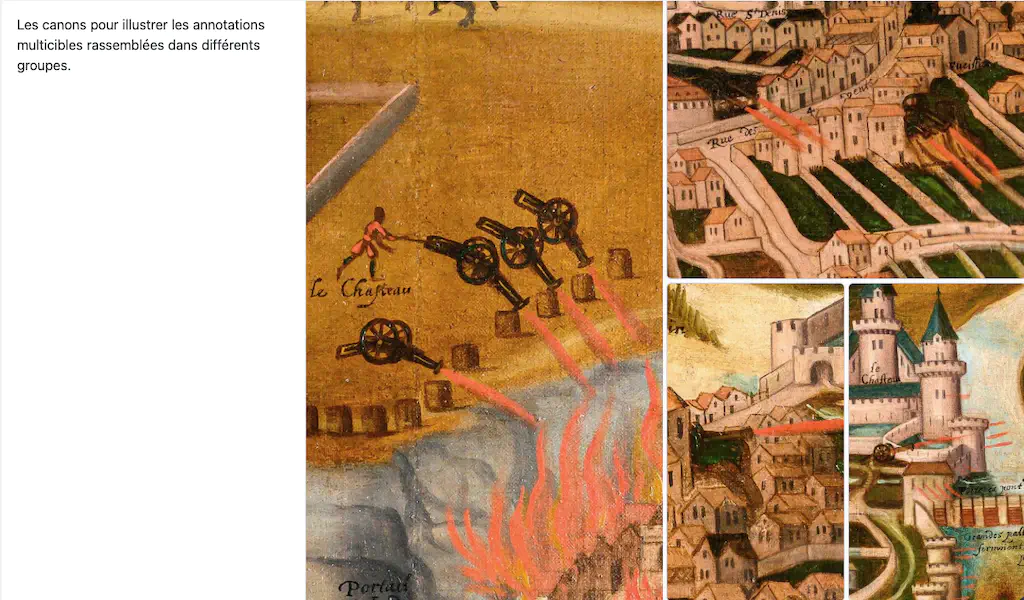
One of Adno’s distinctive features is the ability to handle multi-target annotations, that is, annotations that point to several areas of the image.
In edit mode
The Zones tab of the annotation editing window lets you manage the targets of the current annotation. Targets can be split into different groups so that they are displayed separately. The display layout is automatically driven by this split into groups.
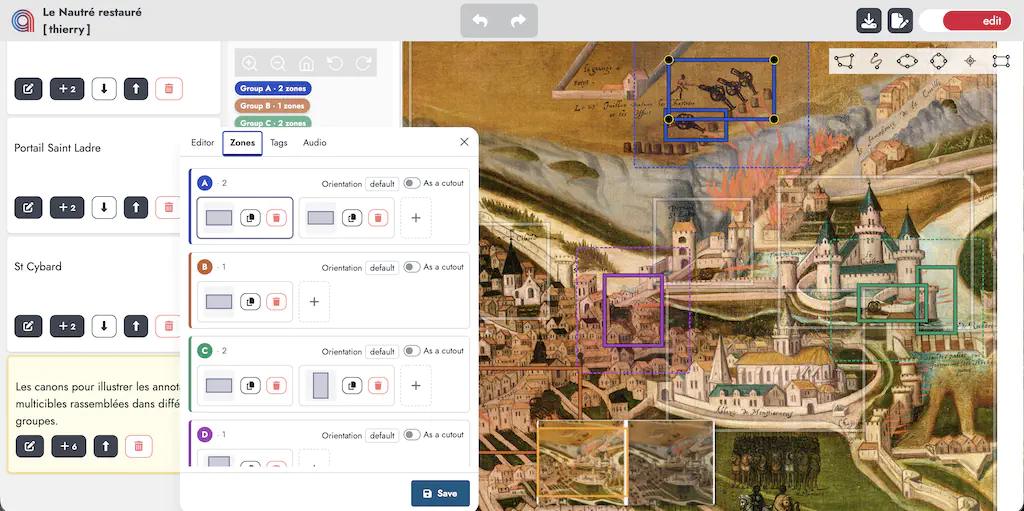
There can be up to four groups. On the image, colored badges show the groups used by the annotation and the number of targets in each.
For each group:
- header: the group label (A, B, C or D) and the number of targets it contains, then the orientation of the annotation and the display option used when the orientation differs from the project default;
- body: the list of targets; drag and drop lets you move them from one group to another;
- for each target:
- a preview of the target’s shape,
- copy the target’s URL, as defined by the IIIF Image API,
- delete the target;
- the
+ ADD A GROUPbutton adds a new group, up to a maximum of four.
In view mode: the content of each annotation is displayed in a margin of the image (left, right or bottom) or in a floating window. Several cases arise when displaying annotations:
- an annotation with a single target, or several targets gathered in a single group: the focus is on the bounding rectangle of all the targets,
- an annotation with several groups: there are as many display areas as groups; these areas are arranged in a spiral, according to the mosaic layout chosen in the settings (ratio of 1/2 or 2/3, starting vertically or horizontally).
Settings: the viewer settings () let you choose where the annotation content is displayed (floating panel, or margin on the left, bottom or right) and the mosaic layout of the target groups.

Managing tags
This tab lets you associate one or more keywords with each annotation. You can select an existing keyword or create a new one. Remember to press the Enter key after typing each keyword.
In the viewer settings, you can then follow routes through the annotations by keyword.
Associating audio
This tab lets you associate an audio resource with the annotation. The first field takes the URL of the audio file and the second takes information about the resource (credit or other).
In the viewer settings, specify how audio is played: individually or as spatialized sound.
Retrieve your projects
Projects are stored in your browser. You will find them again by reopening a session on the site where they were created.
Remember to download your projects regularly
In private browsing, projects are “forgotten” when you close the session. The same can happen with restrictive browser settings.
Share your projects
Present in various places in the Adno interface, the button opens a modal window showing how to save and share a project by exporting it as an Adno file or an IIIF manifest.
In either case, the file is a simple text file in JSON format. It is generally very light, so you can easily send it by e-mail. Once they have imported it into Adno, your correspondent will be able to view it, and also suggest variations or corrections to your project.
You can also place your file online and distribute its URL. To do this, you can use a website or a file server. The IPFS protocol offers an interesting decentralized alternative.
See the Google Drive, Dropbox or IPFS pages of the documentation’s reference guide to find out how to use these services to host images, IIIF manifests or Adno projects.
Embed a project in a web page
Once your Adno project is online, you can make it visible in a web page by inserting an iframe tag and adjusting the parameters below.
<iframe
    src="https://w.adno.app/#/embed?url=PROJECT_URL"
    title="Project title"
    height="600px"
    width="100%"
    allow="fullscreen"
></iframe>
/#/link after the site URL. Example: https://w.adno.app/#/link.By inserting the URL of an image (IIIF or not) or of an IIIF manifest, you get an IIIF viewer that is easy to install.
The Page Block Adno module allows Adno projects to be viewed in the pages of Omeka S sites.
You can also use the Adno views tags component to embed different types of visualization (lists, slideshows, etc.).
Issues
Adno runs in the browser and relies on resources hosted elsewhere on the web. This approach may be subject to restrictions that can affect how Adno works and how it integrates into web pages.
The most common cases:
- It is not possible to insert a resource with an address beginning with
httpinto a secure site served overhttps. For example, if you upload an image to the IIIFHosting service, the default URL provided starts withhttp. To use it in Adno, remember to changehttptohttpsat the beginning of the URL. - CORS settings on a third-party server may prohibit data transfer to another domain. The official Adno instance uses a dedicated third-party service to work around this issue.
Translation
If Adno is not available in your language, you can contribute by adding a new language and proposing translations on the Adno section of the Weblate platform. In the same way, you can propose changes and corrections to existing translations.
Installation
Adno is a service available freely and free of charge online. Adno is also free software, so you can install it yourself or even adapt it to your needs. You can find the source code and all the information on the Adno software repository.
Help
Check the frequently asked questions and the documentation to learn more (note: these sections are still incomplete). If you have any problems or suggestions, please contact us.